Friday, 3 January 2014
ERP - Enterprise Resource Planning
ERP Vendors:
Large Enterprise ERP (ERP Tier I)
Mid Market ERP (ERP Tier II)
The Most Famous Cisco Shortcut keys
A number of shortcuts exist within the IOS command line interface. The most famous shortcut is the ‘TAB’ command, that completes a partially typed CLI command. For istance, if you type “sh ru” and press TAB, it will complete the command as “show running-config“.
Below the complete list of the IOS shortcuts:
Ctrl+T: Swap the current character with the one before it
Ctrl+K: Erase all characters from the current cursor position to the end of the line
Ctrl+X: Erase all characters from the current cursor position to the beginning of the line
Ctrl+L: Reprint the line
Ctrl+C: Exit configuration mode
Ctrl+A: Moves the cursor to the beginning of the current line
Ctrl+E: Moves the cursor to the end of the current line
Ctrl+F: Moves forward one character
Ctrl+B: Moves backwards one character
Ctrl+R: Redisplays a line (starts a new line, with the same command shown)
Ctrl+U: Erases a line
Ctrl+W: Erases a word
Ctrl+Z: Exits configuration mode, returning you to privileged EXEC mode
Ctrl+P (or up arrow): Displays the last command entered
Ctrl+N (or down arrow): Displays previous commands entered
Tab: Completes a partial command
Esc, F: Moves forward one word
Esc, B: Moves backwards one word
Shortcuts Keys
More than 100 Keyboard Shortcuts must read & Share
Find interesting posts at
Keyboard Shortcuts (Microsoft Windows)
1. CTRL+C (Copy)
2. CTRL+X (Cut)
... 3. CTRL+V (Paste)
4. CTRL+Z (Undo)
5. DELETE (Delete)
6. SHIFT+DELETE (Delete the selected item permanently without placing the item in the Recycle Bin)
7. CTRL while dragging an item (Copy the selected item)
8. CTRL+SHIFT while dragging an item (Create a shortcut to the selected item)
9. F2 key (Rename the selected item)
10. CTRL+RIGHT ARROW (Move the insertion point to the beginning of the next word)
11. CTRL+LEFT ARROW (Move the insertion point to the beginning of the previous word)
12. CTRL+DOWN ARROW (Move the insertion point to the beginning of the next paragraph)
13. CTRL+UP ARROW (Move the insertion point to the beginning of the previous paragraph)
14. CTRL+SHIFT with any of the arrow keys (Highlight a block of text)
SHIFT with any of the arrow keys (Select more than one item in a window or on the desktop, or select text in a document)
15. CTRL+A (Select all)
16. F3 key (Search for a file or a folder)
17. ALT+ENTER (View the properties for the selected item)
18. ALT+F4 (Close the active item, or quit the active program)
19. ALT+ENTER (Display the properties of the selected object)
20. ALT+SPACEBAR (Open the shortcut menu for the active window)
21. CTRL+F4 (Close the active document in programs that enable you to have multiple documents opensimultaneously)
22. ALT+TAB (Switch between the open items)
23. ALT+ESC (Cycle through items in the order that they had been opened)
24. F6 key (Cycle through the screen elements in a window or on the desktop)
25. F4 key (Display the Address bar list in My Computer or Windows Explorer)
26. SHIFT+F10 (Display the shortcut menu for the selected item)
27. ALT+SPACEBAR (Display the System menu for the active window)
28. CTRL+ESC (Display the Start menu)
29. ALT+Underlined letter in a menu name (Display the corresponding menu) Underlined letter in a command name on an open menu (Perform the corresponding command)
30. F10 key (Activate the menu bar in the active program)
31. RIGHT ARROW (Open the next menu to the right, or open a submenu)
32. LEFT ARROW (Open the next menu to the left, or close a submenu)
33. F5 key (Update the active window)
34. BACKSPACE (View the folder onelevel up in My Computer or Windows Explorer)
35. ESC (Cancel the current task)
36. SHIFT when you insert a CD-ROMinto the CD-ROM drive (Prevent the CD-ROM from automatically playing)
Dialog Box - Keyboard Shortcuts
1. CTRL+TAB (Move forward through the tabs)
2. CTRL+SHIFT+TAB (Move backward through the tabs)
3. TAB (Move forward through the options)
4. SHIFT+TAB (Move backward through the options)
5. ALT+Underlined letter (Perform the corresponding command or select the corresponding option)
6. ENTER (Perform the command for the active option or button)
7. SPACEBAR (Select or clear the check box if the active option is a check box)
8. Arrow keys (Select a button if the active option is a group of option buttons)
9. F1 key (Display Help)
10. F4 key (Display the items in the active list)
11. BACKSPACE (Open a folder one level up if a folder is selected in the Save As or Open dialog box)
Microsoft Natural Keyboard Shortcuts
1. Windows Logo (Display or hide the Start menu)
2. Windows Logo+BREAK (Display the System Properties dialog box)
3. Windows Logo+D (Display the desktop)
4. Windows Logo+M (Minimize all of the windows)
5. Windows Logo+SHIFT+M (Restorethe minimized windows)
6. Windows Logo+E (Open My Computer)
7. Windows Logo+F (Search for a file or a folder)
8. CTRL+Windows Logo+F (Search for computers)
9. Windows Logo+F1 (Display Windows Help)
10. Windows Logo+ L (Lock the keyboard)
11. Windows Logo+R (Open the Run dialog box)
12. Windows Logo+U (Open Utility Manager)
13. Accessibility Keyboard Shortcuts
14. Right SHIFT for eight seconds (Switch FilterKeys either on or off)
15. Left ALT+left SHIFT+PRINT SCREEN (Switch High Contrast either on or off)
16. Left ALT+left SHIFT+NUM LOCK (Switch the MouseKeys either on or off)
17. SHIFT five times (Switch the StickyKeys either on or off)
18. NUM LOCK for five seconds (Switch the ToggleKeys either on or off)
19. Windows Logo +U (Open Utility Manager)
20. Windows Explorer Keyboard Shortcuts
21. END (Display the bottom of the active window)
22. HOME (Display the top of the active window)
23. NUM LOCK+Asterisk sign (*) (Display all of the subfolders that are under the selected folder)
24. NUM LOCK+Plus sign (+) (Display the contents of the selected folder)
MMC Console keyboard shortcuts
1. SHIFT+F10 (Display the Action shortcut menu for the selected item)
2. F1 key (Open the Help topic, if any, for the selected item)
3. F5 key (Update the content of all console windows)
4. CTRL+F10 (Maximize the active console window)
5. CTRL+F5 (Restore the active console window)
6. ALT+ENTER (Display the Properties dialog box, if any, for theselected item)
7. F2 key (Rename the selected item)
8. CTRL+F4 (Close the active console window. When a console has only one console window, this shortcut closes the console)
Remote Desktop Connection Navigation
1. CTRL+ALT+END (Open the Microsoft Windows NT Security dialog box)
2. ALT+PAGE UP (Switch between programs from left to right)
3. ALT+PAGE DOWN (Switch between programs from right to left)
4. ALT+INSERT (Cycle through the programs in most recently used order)
5. ALT+HOME (Display the Start menu)
6. CTRL+ALT+BREAK (Switch the client computer between a window and a full screen)
7. ALT+DELETE (Display the Windows menu)
8. CTRL+ALT+Minus sign (-) (Place a snapshot of the active window in the client on the Terminal server clipboard and provide the same functionality as pressing PRINT SCREEN on a local computer.)
9. CTRL+ALT+Plus sign (+) (Place a snapshot of the entire client window area on the Terminal server clip board band provide the same functionality as pressing ALT+PRINT SCREEN on a local computer.)
Microsoft Internet Explorer Keyboard Shortcuts
1. CTRL+B (Open the Organize Favorites dialog box)
2. CTRL+E (Open the Search bar)
3. CTRL+F (Start the Find utility)
4. CTRL+H (Open the History bar)
5. CTRL+I (Open the Favorites bar)
6. CTRL+L (Open the Open dialog box)
7. CTRL+N (Start another instance of the browser with the same Web address)
8. CTRL+O (Open the Open dialog box,the same as CTRL+L)
9. CTRL+P (Open the Print dialog box)
10. CTRL+R (Update the current Web page)
11. CTRL+W (Close the current window)
Cisco Certified Network Associate (CCNA)
Cisco Certified Network Associate (CCNA)
CCNA certification is a second-level Cisco Career certification. This certification level validates the ability to install, configure, operate, and troubleshoot medium-size switched and routed networks, including implementation and verification of connections to remote sites in a WAN environment. Upon completion, CCNA candidates should be able to successfully carry out any number of essential networking maintenance and troubleshooting duties such as operating LAN, WAN and dial access services for small networks, as well as having good working knowledge of protocols such as IP, IGRP, Serial, Frame Relay, IP RIP, VLAN’s, Ethernet and Access Lists.
Candidates have the option of two path to get CCNA certified. Either take and pass two individual exams or alternatively, one larger, combined exam. The exam options are:
Combined exam: 640-802 CCNA - 90 minutes.
OR
Individual exams:
- 640-822 ICND1 (90 minutes 40-50 questions) - CCENT certification
- 640-816 ICND2 (75-90 minutes 40-50 questions)
It is higly recommended to students passing CCNA for the first time to use the "individual exams" path as it allows candidates to focus on one subject area at a time and then take the relevant exam when they feel ready. Additionally, the two-exam approach gives the candidate the opportunity to ease into the certification by taking the 640-822 ICND1 exam first.
HSRP Configuration
What is HSRP ?
HSRP (Hot Standby Router Protocol) is a redundancy protocol for setting up a fault-tolerant default gateway in a LAN environment. This is a Cisco proprietary protocol. The standard protocol is VRRP (Virtual Router Redundancy Protocol).HSRP in Packet Tracer 6.0
HSRP is a new feature of Packet Tracer 6.0 . This protocol can be configured on every Cisco router available in Packet Tracer as well as on Cisco Catalyst 3560 layer 3 switch.
The following IOS commands are available :
- standby <0-4095> ip Enable HSRP and set the virtual IP address
- standby <0-4095> preempt Overthrow lower priority Active routers
- standby <0-4095> priority Priority level
- standby <0-4095> timers Hello and hold timers
- standby <0-4095> track Priority Tracking
HSRP configuration using Cisco 2911 ISR routers

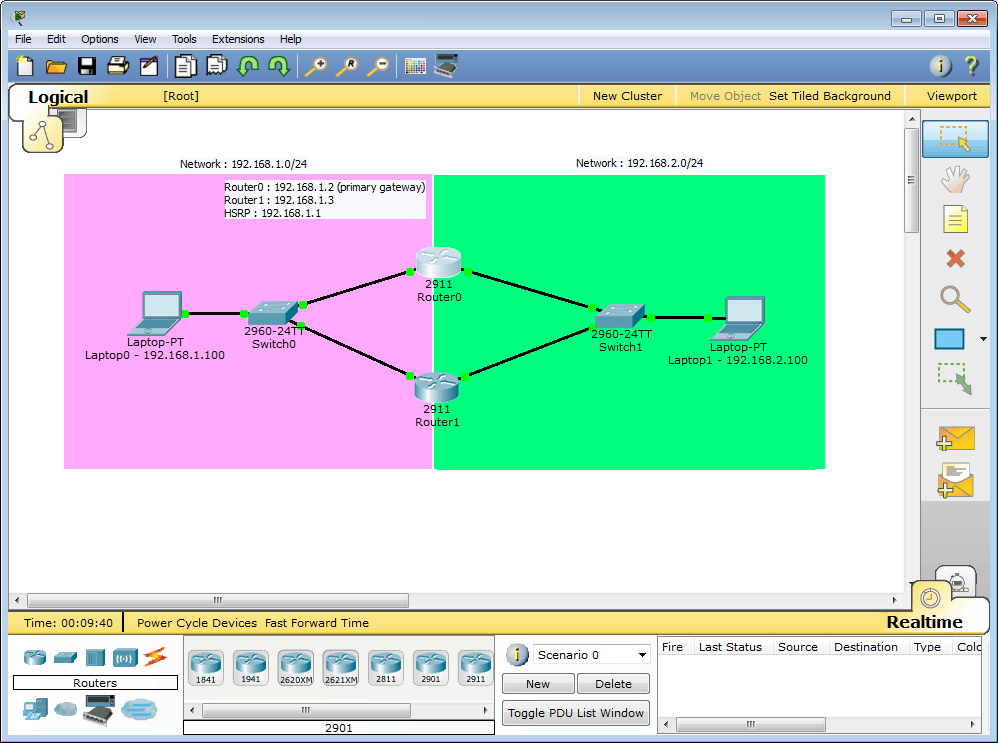
Two network are configured for this tutorial :
- Network 192.168.1.0/24
- Router0 : 192.168.1.2 (GigabitEthernet 0/0)
- Router1 : 192.168.1.3 (GigabitEthernet 0/0)
- Network 192.168.2.0/24
- Router0 : 192.168.2.2 (GigabitEthernet 0/1)
- Router1 : 192.168.2.3 (GigabitEthernet 0/1)
Two HSRP groups are configured on the ISR routers :
- HSRP Group 1 :
- IP address : 192.168.1.1
- Router0 with priority 120 (preemption enabled)
- Router1 with HSRP default priority (100)
- HSRP Group 2 :
- IP address : 192.168.2.1
- Router0 with priority 120 (preemption enabled)
- Router1 with HSRP default priority (100)
Routers configuration
Router0 configuration
interface GigabitEthernet0/0
ip address 192.168.1.2 255.255.255.0
duplex auto
speed auto
standby version 2
standby 1 ip 192.168.1.1
standby 1 priority 120
standby 1 preempt
!
interface GigabitEthernet0/1
ip address 192.168.2.2 255.255.255.0
duplex auto
speed auto
standby version 2
standby 2 ip 192.168.2.1
standby 2 priority 120
standby 2 preempt
Router1 configuration:
interface GigabitEthernet0/0
ip address 192.168.1.3 255.255.255.0
duplex auto
speed auto
standby version 2
standby 1 ip 192.168.1.1
!
interface GigabitEthernet0/1
ip address 192.168.2.3 255.255.255.0
duplex auto
speed auto
standby version 2
standby 2 ip 192.168.2.1
Preemption is configured on Router0 using the standby X preempt commands. This router will always assume HSRP active state when it's online and if it has the highest HSRP priority in the network. The same configuration without the standby x priority 120 configuration on Router0 does not work and Router1 assumes the active state because it has a higher IP address configured.
Testing the configuration:


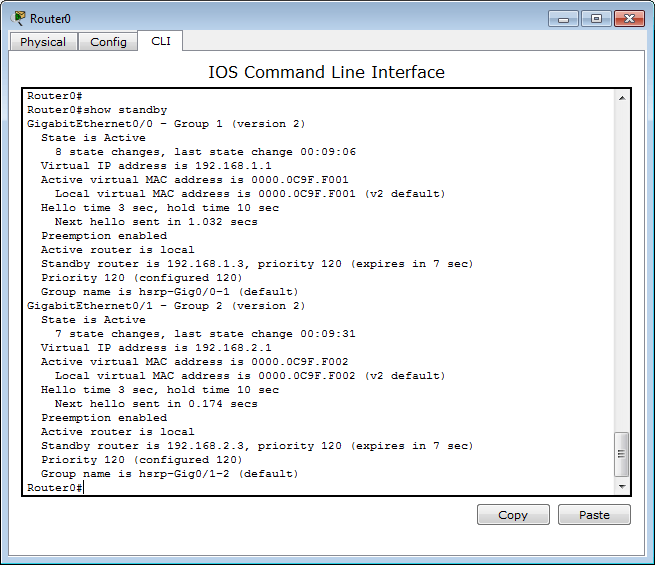
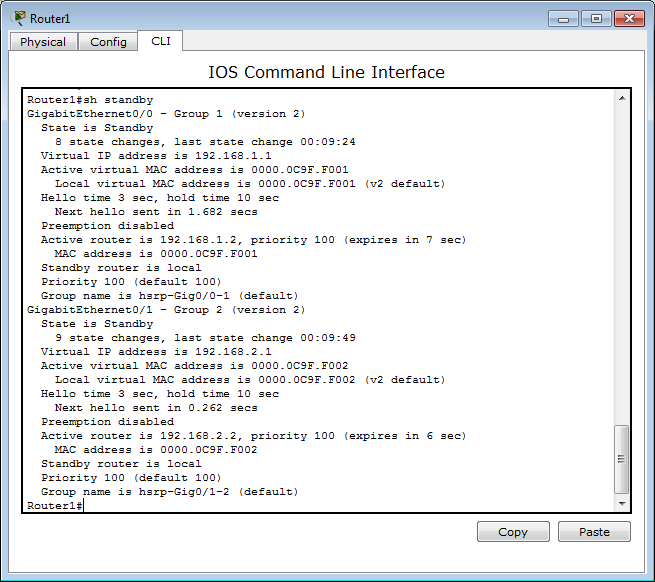
Router0 is active for both HSRP groups. Both routers detected each other correctly but the priority seems to be wrong (Standby router is 192.168.1.3, priority 120 should be Standby router is 192.168.1.3, priority 100 on Router0)

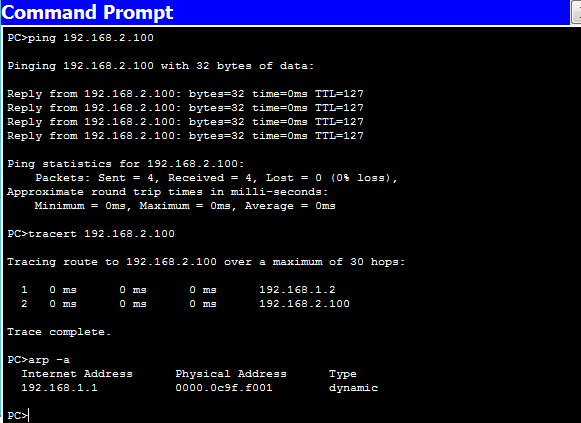
Ping, traceroute and arp commands issued on Laptop0 confirms that the configuration is working. The IP packets are transiting through Router0 (192.168.1.2)
Known bug
HSRP can be configured the same way on Cisco 3750 multilayer switch vlan interfaces in Packet Tracer 6.0.1.
interface Vlan100
ip address 192.168.1.2 255.255.255.0
standby version 2
standby 1 ip 192.168.1.1
standby 1 preempt
!
interface Vlan200
ip address 192.168.2.2 255.255.255.0
standby version 2
standby 2 ip 192.168.2.1
standby 2 preempt
ip address 192.168.1.2 255.255.255.0
standby version 2
standby 1 ip 192.168.1.1
standby 1 preempt
!
interface Vlan200
ip address 192.168.2.2 255.255.255.0
standby version 2
standby 2 ip 192.168.2.1
standby 2 preempt
However :
- Laptops can't ping the HSRP IP addresses configured on the multilayer switches
- The packets are not forwarded between the 2 laptops if the HSRP address are the default gateways configured on both pc.
Wednesday, 1 January 2014
15 Amazing Facts On Global
1. Internet Usage That u don't know 1. 35.6% of internet users are Asian.
2. With average of 389 million of internet surfers each month, Asia is the largest internet crowd among other world regions.
3. In Africa, 3 out of 100 surf the Internet.
4. In Asia, 10 out of 100 surf the Internet.
5. In Europe, 38 out of 100 surf the Internet.
6. In Middle East, 10 out of 100 surf the Internet.
7. In North America, 70 out of 100 surf the Internet.
8. In Latin America, 16 out of 100 surf the Internet.
9. In Australia, 53 out of
100 surf the Internet.
10. Only 16.6% of world population surf the internet.
11. 1 billion users around the globe are surfing the Internet every month.
12. Amount of internet surfers in Asia (389,392,28 mil) is 11 times the population of Australia
(34,468,443 mil).
13. 19% of internet users are from United States (210,080,067 mil).
14. Around 18 countries still doesn't have Internet connection.
15. North Korea’s internet penetration statistics is not publicized. If you liked It, then please
share it with Others.
Full names of 10 famous companies
DHL - Dalsey Hillblom Lynn
IBM - International Business Machines
TLC - The Learning Channel
FIAT - Fabbrica Italiana AutomobiliTorin o
HMV - His Master's Voice
TCS - Tata Consultancy Services
SAP - System Analysis and Program
Amul - Anand Milk Union Limited
IKEA - Ingvar Kamprad Elmtaryd Agunnaryd
HTC - High Tech Computer
Force10-MXL
2
Dell MXL switch configuration
These steps show you how to
configure two Force10 MXL 10/40GbE blade switches with a LAG. The switches are
interconnected using two of the 40 GbE Quad Small Form-factor Pluggable (QSFP)
uplink ports, and the LAG is configured for Dynamic Link Aggregation Control
Protocol (LACP).
2.1 Hardware configuration
1.
Power on the Chassis.
2.
Login to the Chassis CMC.
3. From the CMC CLI, connect to
the Force10 MXL 10/40GbE blade switches.
2.2 Delete startup
configuration
Note: The following commands will delete all configuration
settings.
FTOS>enable
FTOS#delete
startup-config
Proceed
to delete startup-config [confirm yes/no]yes
FTOS#reload
System
configuration has been modified. Save? [yes/no]no
Proceed
with reload [confirm yes/no]yes
Note: The switch will reboot.
2.3 Disable iSCSI optimization
FTOS#configure
FTOS(conf)#no iscsi
enable
FTOS(conf)#
2.4 Disabling
DCB configuration
FTOS>enable
FTOS#configure
FTOS(conf)#no
dcb enable
FTOS(conf)#exit
FTOS#copy
running-config startup-config
FTOS#reload
Note: The switch will reboot.
2.5 Configure out of
band (OOB) management port
FTOS>enable
FTOS#configure
FTOS(conf)#interface ManagementEthernet 0/0
FTOS(conf-if-ma-0/0)#no shutdown
FTOS(conf-if-ma-0/0)#ip address ipaddress mask
FTOS(conf-if-ma-0/0)#exit
2.6 Configure route
for OOB management port (optional)
Force10(conf)#management route X.Y.Z.0 /24 A.B.C.1
Note: X.Y.Z.0 is the network your management
system is connecting from and A.B.C.1 is the gateway for the switch. If your
management system is on the same subnet as the switch, the previous step may be
omitted. The example above assumes a class C subnet mask.
2.7 Configure login credentials
FTOS(conf)#username
admin privilege 15 password 0 P@ssw0rd
FTOS(conf)#enable
password level 15 0 P@ssw0rd
FTOS(conf)#exit
2.8 Enable
switch ports
Use
the commands for Option 1 or Option 2 to enable the switch ports.
Option 1: You can enable ports individually by
entering the port number.
FTOS#configure
FTOS(conf)#interface tengigabitethernet 0/1
FTOS(conf-if-te-0/1)#switchport
FTOS(conf-if-te-0/1)#no shutdown
FTOS(conf-if-te-0/1)#exit
FTOS(conf)#exit
Option 2: You can enable multiple ports at once using the
‘range’ parameter.
FTOS#configure
FTOS(conf)#interface
range tengigabitethernet 0/1 – 32 , tengigabitethernet 0/41 - 56
FTOS(conf-if-range-te-0/1-32,te-0/41-56)#switchport
FTOS(conf-if-range-te-0/1-32,te-0/41-56)#no
shutdown
FTOS(conf-if-range-te-0/1-32,te-0/41-56)#exit
2.9 Enable Jumbo Frames
FTOS(conf)#
interface range tengigabitethernet 0/1 – 32 , tengigabitethernet
0/41 - 56
FTOS(conf-if-range-te-0/1-32,te-0/41-56)#mtu
12000
2.10 Enable flow control
(optional)
FTOS(conf-if-range-te-0/1-32,te-0/41-56)#flowcontrol
rx on tx off
2.11 Configure Spanning tree on
edge ports
FTOS(conf-if-range-te-0/1-32,te-0/41-56)#spanning-tree
rstp edge-port
FTOS(conf-if-range-te-0/0-32,te-0/41-56)#
2.12 Configure
port channel for LAG
These
commands configure the switch interconnect as a LAG.
FTOS(conf)#interface
Port-channel 1
FTOS(conf-if-po-1)#mtu
12000
FTOS(conf-if-po-1)#switchport
FTOS(conf-if-po-1)#no
shutdown
FTOS(conf-if-po-1)#exit
2.13 Configure QSFP ports for
LAG
These commands assigns 40Gb
QSFP ports to the Port Channel.
FTOS(conf)#interface
range fortyGigE 0/33 , fortyGigE 0/37
FTOS(conf-if-range-fo-0/33,fo-0/37)#mtu
12000
FTOS(conf-if-range-fo-0/33,fo-0/37)#no
shutdown
FTOS(conf-if-range-fo-0/33,fo-0/37)#flowcontrol
rx on tx off
FTOS(conf-if-range-fo-0/33,fo-0/37)#port-channel-protocol
lacp
FTOS(conf-if-range-fo-0/33,fo-0/37-lacp)#port-channel
1 mode active
FTOS(conf-if-range-fo-0/33,fo-0/37-lacp)#exit
FTOS(conf-if-range-fo-0/33,fo-0/37)#exit
FTOS
(conf)#exit
2.14 Save configuration
FTOS#copy
running-config startup-config
2.15 Configure additional
switch
Repeat the
commands from section 2 to configure the second switch.
Subscribe to:
Comments (Atom)


